PLOWSHARE THURSDAY – COMPANIONS.

The thing I am most grateful for in our gardening endeavors today is that we learned how to use “companion planting” to our benefit!

Those that may not have heard of this before: It is the method of planting that puts one or more plants next to each other, to naturally protect and strengthen them.

What this means is very simple:

  • Plant carrots with tomatoes.

carrots n tomatoes

  • Plant dill with just about everything.

dill-in-gh.jpg

  • Plant marigolds with just about everything.

marigolds

  • Oh, and when possible, leave a place totally natural – untouched!

wild plant area

The last one is a HUGE secret that we found out about last year.

The fire three years ago set us back on all of our normal routines.  The biggest damage occurred on the land and gardens.  To have something, anything, for harvest in the fall of 2014; we chose to let parts of the farm and gardens go natural.

Then in 2015, we were still trying to get a handle on things, and I was still doing surgeries.  Since I am the main person working on the farm and gardens, I was in no shape to keep up with it all (and we only garden on about 5 of our 20 acres.).

It was summer of 2016 when it came time to finally tame the whole area.  We have one long field that is about 100-feet wide by about 200-feet long.  It is the length of the whole main area of our farm.  Nothing is growing in there except weeds and wild grasses.  The chickens loved roaming around in there after bugs and worms.  The problem by mid-summer is that we could not see the chickens in the tall grasses anymore – HUGE DANGER FOR CHICKEN FARMERS!

Even though we had not seen or heard a coyote or fox in a couple of years, we did not want to take the chance.  Thus the major mowing finally began.  My sister was smart!  Out of the fire funds, we managed to purchase a John Deere Riding Mower – best investment ever!!

I put on my pretty sun hat (not – but it works- ha ha), doused myself with sun screen and bug repellant started the monster up and away I went.  What fun it actually was!  I could get pretty close to things so we would only have to push-mow a few spots when I was done.

When I got to the long field, I went around the first corner, and a praying mantis landed on my arm!  I stopped mowing, caught it with my hand and put it into the greenhouse.  It took me about 3 hours that first day to clear that long field (normal is only about 1 hour), due to the friendly critters!

We then realized that the corner where we had a pile of old wooden posts had attracted a bunch of bad bugs, which then attracted a bunch of good bugs – viola – natural pest controls!

We used to trim up everything thinking that this would keep the nasties away – nope, the best we ever did was to leave the woodsy area alone.  Most of the long field gets mowed now, but a large section with the wood gets left untouched.

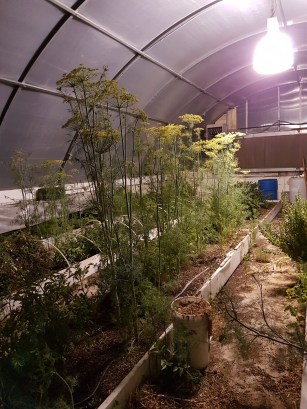
Companion planting works in the same manner.  You plant things next to each other to deter the bad bugs and naturally attract the good bugs.  I even let the dill in the greenhouse run amok this summer.  It is over five-feet tall.  Has seed heads the size of basketballs, and attracts the aphids.  I have no clue why they love the dill more than all else, but they do.

I can now plant dill in succession and simply cut down and bad the old buggy stuff and throw it in the trash.  The plastic bags will suck out the air and kill them, or they will be moved to the dump when the trash guy comes.

I can still find a bit on my food plants – but not as much and it is easy to take care of with wash or wiping.

Hope this helps – happy gardening!

(If you enjoyed this bit of humor, please feel free to visit my latest blog: Life Lessons Lived  to get more laughter in your life!)

Follow my blog with Bloglovin

SEASON TWO – WOO HOO!!

It’s time for the next game-plan here on our little slice of heaven – food season!

The grandson started school this week. Therefore I now have more time to spend on/in the gardens (can you hear me jumping for joy?!).

First thing I am working on is revamping the greenhouse.  It’s been going well for the last five years, but it’s time for some improvements, at least I hope they will be in the long run.

  1. Tomato Racks: We have tried a number of ways to work with our tomatoes to get the best results:
    1. Wire tomato cages – not good in the greenhouse. The weather in there makes the cages fall apart after only a couple of years.
    2. We took an idea from our local Corp. Hydroponic Tomato Plant. They “hang” their tomatoes on long lines.  Once I understood the necessity of trimming off lower branches and useless branches, hanging seemed like a great idea.  Nope, the ropes disintegrated, and wires cut the stalks.
    3. Let them lay where they will. VERY WRONG IDEA!  Yes, we had tons of tomatoes, but we could not find most of them until too late.  Either they would rot or get stepped on.  Unless we could see them, we would lose them (and we lost too many for our liking!).
    4. Now we think we have a solution – a wooden rack:


So far, so good!  The only issue we have is that I thought of it too late.  The tomatoes in the background (pic on the left shows best – the walkway disappeared – hee hee), are how long and bushy we are already.

We had to go on one row/side of the plot and flip all the branches over to the other side.  Then we installed the rack.  Once in place, we very delicately found each vine and hung it on the rack.  There is a metal field fence (has 4”x4” squares to it) piece attached to the wooden rack for us to build the vines on.

They went into a bit of shock right after propping up; however, it has been about two weeks now, and they are starting to bounce back.  During the whole time, we had plenty of tomatoes.  We had enough that we can begin our barter time:

  • Eggs for tomatoes.
  • Squash for tomatoes
  • Fruit for tomatoes
  • Even got a new thermostat on the truck for a loaf of bread and a bunch of tomatoes (tiny eaters and large sandwich type).

We hope to have the three racks installed in that row by the end of the month (mid-September at the latest).  The front faces west which is our most intense heat.  This leaves the east side in full to partial shade by mid-afternoon.  Carrots, lettuce, spinach are going in there.  We are also building frames to go over the racks for extra cover on really cold nights.  One other year we had tomatoes through Christmas. Hope we can do that again this year.  Fresh tomatoes make such a great gift!

Happy gardening!!

(If you enjoyed this bit of humor, please feel free to visit my latest blog: Life Lessons Lived  to get more laughter in your life!)

Follow my blog with Bloglovin

PLOWSHARE THURSDAY AUGUST 17, 2017:

I was away for a bit, but am now back.  Since I was also away from my gardens and garden work, I had a TON of catching up to do.  Funny how falling out of sync for just one week can throw your gardens into an ugly frenzy!

My share today, because of the garden frenzy, is this great little invention:

y-faucet connectorHere we call it a Y-connector.  Most people will attach it to their outside faucet to obtain the ability to water two spots at once.  We go the next step.  We have drip lines EVERYWHERE in our gardens.  They are most helpful in the greenhouse as there is no rain to supply backup water in there.

Even with our whole end swamp cooler going, the plots in there can still dry out pretty fast.  Especially on those 90+ degree days with full sun.  When we initially started up the greenhouse, everything was watered by human power.  Dragging a hose with a nozzle on the end of it up and down, over and under all the plots and plants – not a good thing Martha!

Then (as it always seems to happen) we got smart!  Drip lines were installed.  We tried several different types with several different connections and extensions.  Over the years, and a ton of trial and fail, we came up with running two long lines about six to eight inches away from the edges of the plots the full length of the plots.  Since the plots are about forty feet long and the lines are about fifty feet long, we looped the ends to come back into the center of the plots.  We used to connect to each line one-at-a-time – DUH!  Thus the inclusion of Y-connectors.

We now have both drip lines connected to the same single y-connector.  The end of that has a quick-connect attachment which we can then simply snap on and off each plot for easy, even watering.  We have our own well, but I set a timer for everything I do.  The normal time of each plot is thirty minutes.  This manages to place the water right where the plant root systems are set.  We also (just this year – another “get smart” idea that came to us) set the lines about two to three inches below the surface.  This has managed to deep water beautifully!

We used this maneuver on one of our outside tomato lines for the first time this year – outstanding results!  Before this, we would just place them on the top of the soil near the plant stalk.  It never appeared to be providing the amount of water that we wanted.  By setting them up “BELOW” the surface, the results have been amazing.

It should be noted that we do not use any type of poking device to make a hole for the initial sets transplants.  Hands work just fine, and my finger nails get a strong dose of great minerals that make them stronger (don’t know how that works, just that it does?).

Please feel free to comment any questions you have in our method(s), and I will be happy to share our secrets with you.

Happy Gardening!


WHERE DO YOU DO “IT” AT?

Ok, most of you – get out of the gutter! I am talking about food processing here.
We have such a nice new house with outstanding new porches that it would be a shame not to use them every chance we get.
Well, the food processing season has come upon us once again. This time around we decided to do the messiest parts of the job outside whenever possible. The beginning project is beets.
Those of you have (and love) done up pickled beets know just how messy they get. The red in them, I swear, could dye the roughest of materials! With having such a beautiful, huge, new kitchen; the last thing we wanted to do was dye areas with bits of the red mess. Thus our decision to process them outside.
The cooking was done inside as that is easy enough to maintain, but the peeling and cutting are definitely done outside.
I sit on one side of the 8’x8’ area:

8-4 my fav process spot

My sister sits on the other:

8-4 d fav process spot

(Her delicate butt gets the extra chair pad – so not fair as mine is rutabaga style and deserves more!)
We have our garden tool box, music, some plants that will go back into the house come fall, and of course a place to set our drinks. The pics here are when we enjoy the area the most – early morning!
There is a yellow bug light bulb in the porch light to keep most of them at bay. The fun part is when we turn on the south door light (a regular 60-watt bulb), it will draw up all kinds of critters. The critters find their way to the front yard, and we can view them comfortably from our perch.
The honeysuckle is just past the porch which attracts some really cool critters: humming birds, humming bird moths, during the day we get a variety of bees and butterflies. I think I prefer the night ones; they are usually more interesting.
Once we have the base steps done in the house, it is time to venture to the veranda:

8-5 how we process foods-beets

If you look close at the bottom, you can see one of our many un-requested helpers doing what they normally do – sleep (animals!?). Also, note how smart my sister is! She remembered to put on her latex gloves BEFORE beginning – woo hoo smartie! We purchased boxes of the disposable things specifically for the beets and hot peppers. Now we need to have some type of auto-reminder not to touch your face when you are processing foods as you will end up with pepper juice in the eyes, and very pretty red dye streaks all over your face and neck (yes, been there, done that!).

If you enjoyed this (and maybe laughed a bit), then please check out my new blog: Life Lessons Lived where I share more bits and pieces of my humoristic life!

Follow my blog with Bloglovin

PLOWSHARE THURSDAY – PREVENTION GEAR!

Hi, guys!  Sorry, I have not been keeping up with things, but if you read my last post, you know why.  This Plow Share is to tell you more about my new favorite best friend in the garden – the head cover.

bug net cover (This one is from Amazon – under $5)

I originally found these things years ago and purchased them through a sporting goods website.  Oh, silly me!  I guess at the time the only reason for one was when you went fishing.  It kept all the water bugs off your face while you fished.

Well, times have changes sister, and we need these everywhere!

At first, it was just the tiny gnats that were bothering me while watering.  Then came the black flies and their nasty bites as the weather warmed.  Of course, we cannot forget the mosquito and all its plagues.

If you read my last post, then you know (and saw) the reasons why this is now my new best garden friend!  I have gotten bit or stung on several parts of my body (mainly arms and legs but there has been the occasional buttox when I bend over) with very little reaction.  I was even bitten by a Brown Recluse which has left a nasty scar, but my great immune system held it at bay.  I have never had a severe allergic reaction to anything until now.  The funny part is that it was the cure and not the cause that had the bad reaction.

brown recluse    (FYI you are supposed to spot the “fiddle” on its back?!)

I consider myself very lucky in the fact that it never affected my lungs.  My breathing throughout all of this remained normal, as did my blood pressure – go figure?!  My doctors and I boiled it down to the fact that the sting was on my face (never happened with a wasp before – or a bee).  Apparently, the thin skin (who would have thought I have “thin” anything – ha ha), gave the poison a perfect reaction area.

So, my share this week is to also warn – GET YOUR GEAR ON!  I do not use bug spray on my head area (a weird thing I have about chemicals and my face), but this head screen gear is a Godsend to gardeners!  It may have been created just for fish folks – but herbivore’s like it too!

WHEN TROUBLE COMES IN THREES WHAT CAN YOU DO?

I started this post but got too wordy. So, instead, I am going to tell you a story.

Once upon a time, there was a young, old woman who loved to garden. She loved the seeds, the starts, the transplanting and even the weeding.

This young, old woman was so into her gardens that she did not mind if a bee landed on her to say hi or rest. It did not make her flinch to come across a spider the size of a silver dollar while working away. Even the surprise toad or snake did not deter her from her daily visits to the natural beauty.
lady and a bee
Then one week she had the terrible three’s visit her.
First: She ran into the turkey door latch and severely bruised her upper arm (which just happened to be right by her first major surgery: Reverse rotator cuff replacement).

Second: She tripped over the mat by the front yard garden gate and fell on her left side ribs. This caused her to take her breath away, and she was very sore, but still able to go on.

Then, late Friday afternoon that week the terrible third struck. While humming one of her favorite songs and weeding the front yard patio, she heard a buzzing sound by her right ear. The dreaded black biting flies had been around all afternoon, but she would put on a bit more bug repellant, and they would leave her alone. She believed it was just another fly, so she raised her hand to shew it away. Little did she realize at that moment she was irritating a wasp!

The monster stung her right by her right ear – on the face. She again did not flinch as she assumed it was the black fly. The evening went on as a normal Friday game night, but she realized that the right side of her face was very hot and kind of itchy.
On Saturday morning, she realized that her right eye seemed a bit blocked. Taking her normal morning trip to the bathroom, she glanced into the mirror and was shocked! The whole right side of her face was swollen. She now realized that it was not a black fly that stunk her – it was her old nemesis the wasp!

Then by Sunday morning, the swelling was growing across her face. Having been stung many times before (mind you there was NEVER a serious allergic reaction – EVER!) she simply took some aspirin, grabbed an ice pack and proceeded to place it on and off her face all the rest of that day.

Monday morning came, and the swelling was still getting worse, so she decided she had better visit her local hospital ER. Upon arriving and being all checked in, the doctor prescribed prednisone – 20 mg which is a type of steroid. She immediately went to her friendly pharmacy and filled the prescription. As soon as she got back into her car, she took the first pill.

Later Monday afternoon her head felt as if it was on fire. She was heating up but chilled, and everything (including her hair) had a burning itch which she was told not to scratch. That night she felt flu-like symptoms: Fever, chills, and a possible need to throw up.

Tuesday morning, she was the size of a party balloon! The swelling was not going down but seemed to be getting worse. Her eyes were so swollen she could not even see her beloved computer to write her thoughts. She took the 2nd pill.

balloon head

Wednesday was, even more, worse than Tuesday, but she took the 3rd of the four pills. Completely miserable, she could not sleep that night. Luckily the ER Doctor did tell her to schedule a follow-up appointment with her regular Doctor within 4-days. She had done so and was to see her doctor on the next morning.

Thursday morning came, and she did NOT take the last pill (by now it had dawned on her that the steroid and she were not in agreement!) and headed off to her doctor.
Once the Doctor took one look at her she knew – this was some type of allergic attack. Her Doctor proceeded to call over to her Pharmacist an order of Claritin and Zantac (prescription level) and over-the-counter Benadryl.

The young, old woman got safely back home and immediately started the routine of meds. By that same evening the burning, itching all over her head had ceased! Saturday morning she would see out of the left eye, but it was still fairly swollen. It took a full 10-days for all the bad steroid reaction to mellow out.

The moral of this young, old woman’s story:

Use the damn head nets you bought three years ago stupid!
(See Plow Share Thursday for more info.)

alergy pic 1 6-10    alergy pic 2 6-15

alergy-pic-3-6-17.jpg    alergy pic 4 6-26 all better

All better!

Friday Funny: Ballet – OR – Did you catch that mouse?

Once upon a time, there was a little girl with very curly dark hair that loved to run and jump and play.  She had a horse to ride, dogs to run with, and a sister to get into trouble with.  Alas, this beautiful little girl was a klutz!

Her mother was full off cute old-fashioned sayings to explain her clumsiness in a way that would not make her feel sad or embarrassed:

  • “Keep doing that with your eyes and they will stay that way.” (After she would walk into the door because she had her eyes crossed.)
  • “Did you catch that mouse?“ (After she would trip and fall.)
  • “Here, you want to fight so bad, just take this butter knife and do it!” (After she and her sister got caught fighting – again!) (FYI: All they ever did was stare blankly from their mom to the knife, then to each other.  Sometimes it would end up in a mock sword fight.)

Well, that pretty young girl grew up to be a crusty, broken, old lady that still never watched where she was going.  This dizzy broad could not even pick up her feet high enough to get over a simple gate mat. 

gateway mat  (Take a good look at the cinder block in the top center)

Trip – slow motion fall – full body slam into the brick patio, iron arch entry frame, and of course planting her left side ribs squarely on top of a busted cinder block.  Her aim is impeccable!

5-6-17 bruised ribs (2)  Bruised Ribs (never had this before)

6-6 bruised knee Bloody and bruised knee – right by the replacement (because apparently a full replacement was not painful enough!).

 6-6 finger smash n tear (2)Ripped bloody finger from who knows what (thinking I may have tried to catch myself and missed?).

So, today’s lesson kids: 

Is it considered “ballet” if you spin as you fall, or can you use the excuse of “I am trying to catch a mouse” when none is present? 

Of course, you first have to stop laughing at yourself to declare either.  (FYI – not laughing now, hurts too much – boo hoo!)

PLOWSHARE THURSDAY – My new best garden friend!

We are a natural farm. I am pretty sure that the pests – weeds and bugs – in the area know this. The reason I know this is because we have so many on our property. The bugs are controlled via natural methods:

• Salt, soap, & vinegar solution.
• Companion Planting.
• Creative natural habitats to encourage good bugs (bad bug eaters).
The more difficult to tackle is the weeds. Heavy mulch works to a point; then other methods must be enlisted. This week’s plowshare…The Hand Hula Hoe!

hand hula hoe(Handle length is about 18 inches total)
What a God send this little hummer is!
We have had the original version for over a decade:

hula hoe original

This one is perfect if you like to stand/walk and weed around your plants. The blade scoots just beneath the top layer and slices through the weed – woo hoo!
Me, I prefer to get closer to my subjects. I get down on the ground, so I am at about eye level to my plants. The thing is for years I have used the old “hand hoe” and would not feel like I was getting very good control of things. The old ones that we have are like this:

regular hoe
with variations like these:


None of these is a bad method, just not the one that I/we prefer.

I have a dear friend that swears by her garden shears (scissors) and will sit beside her beds and nip off the weeds with them just below soil level. Nice, but tedious. This beauty does the same bit only much faster!

I still use a jar of vinegar for my bindweed as it comes back way to fast. This is one that I love to get right into the root. However, sometimes they move faster than I can keep up and will wrap around my amazing veggies – grrr! This is the perfect time for the vinegar!
It is easy to do:

  1. Find a loose branch of your runner vine or unwind some of it from your beloved plant.
  2. Open your jar of vinegar (we put ours in a mason jar because it is easier to use and seal).
  3. Place the separate vine into the vinegar for just a second or two.
  4. Pull it up allowing the excess to drip back into the jar.
  5. I like to put down several layers of newspaper or a thick cardboard before laying that dipped vine back on the ground (just like to make sure I am not leaking to anything good). Place the vine back down and let Mother Nature do her work.

The vine absorbs the liquid to the root and viola’ – dead vine! Two things to be aware of with this method:

  • Make sure you do not set the vinegar part near a good plant. It may seep into the soil and kill it as well.
  • Make sure you are going to have at least one good dry day to allow the moisture to go into the root. DO NOT WATER THAT AREA THAT DAY! You are trying to make sure the plant absorbs only the moisture you provided.

Hope this helps in your gardening adventures! The hand Hula Hoe can be purchased almost everywhere now. It is carried in most home and garden centers. Happy Gardening!
6-6-17 mock orange ours (2).jpg                               (Our beautiful Mock Orange Bush just two days ago!)

NEED SOME HELP? PLOWSHARE THURSDAY:

Those of you that have never been fortunate enough to live on a farm, plowshare (according to Merriam-Webster definition) is a part of a plow that cuts the furrow.  It cuts through the old stale gunk that may be devoid of any nutritional value and gets to the good stuff.  Starting this Thursday – May 25, 2017 – I am going to try to plowshare with you, my friends, family, and readers.

First and foremost, I want to make clear is I do not get paid for sharing this information!  I have no connection to any of my finds except that I approve of them because I use them and they work.  I only want to share the things that we personally do or use.  If some part of it didn’t work, I would share that too.

The subject today: Tomatoes.

tomato variety 2017

Since my blog is Helbergfarmstories, I will stick to the farm/gardens aspect of these shares. (I am developing a new blog just for human nature/survival items and will let you know when that is ready.)  The share for today is about growing the best natural tomatoes you can do at any place you have.

I love PBS (Public Broadcasting System), and our local station airs a show called Growing a Greener World.  I just finished watching Episode 803- Epic Tomatoes with Craig LeHoullier (dated by GGWTV on 4/29/17, but I tape all of them then sift through what we can use here in Colorado.).  I actually learned several new things and just couldn’t wait to share!

It is spring here in Colorado.  I have already put all of our seed starts from February into the greenhouse and outside gardens.  Since watching this program, I want to go back and do it all again.  I like to think that my sister and I know what we are doing (hahahaha – ok, stop laughing), but there is always something new to learn.  This was one of those “how could I have been so stupid for this long” moments.

The creator of the show, Joe Lamp’L, describes and share all the ins-and-outs of his garden (which, I must say looks pristine!?!), but he also interviews other influential people in the natural and organic gardening arenas.  Episode 803 what a hit and an eye-opener for me!

The first thing that caught my attention what the man he was out doing the interview on, got to name the “Cherokee Purple” tomato, which happens to be one of our most favorites!  Then I saw that he was doing most all of his gardening in his driveway!   WHAT??  Now we use pots, and plots, and rows, and have even grown in straw bales – but a driveway?  Well – IT WORKED!

The setup he has is amazing!  Everything from where and how he sows his seeds, to the layout in his driveway truly surprised me (not easy to do with this old lady!)!  Here we have been meticulously separating all our tiny little tomato seeds to carefully get only one in each little honeycomb space.  Now I see WE HAVE BEEN DOING IT ALL WRONG!!!

I fell in love with this guy’s methods and reasons for them!  However, I have a new problem…I want to do more!

  • I knew about pruning the tomato plants as they grow. Have known that one for decades.
  • I know about the value of the heirloom breeds also from experience. This experience was best proven by the taste method.

One year, about ten years ago, a good friend of ours decided to try his hand at growing heirloom tomatoes.  He builds a perfect setup in his heated garage and then proceeded to plant every single seed in the tomato packets AND about 20 different breeds of them.  This led to tomatoes coming out the windows – literally!  He didn’t know what to do with them all, but he knew we had much more room than he did.   Of course, we said we would take as much as he wanted to toss our way – oh silly us.

heirloom seed packets

We worked rigorously for several days straight to create our first two – hundred foot rows.  It was worth all the effort as we had no greenhouse at that time to extend the harvest.  Everything had to be done NOW – dig and weed the plots, put in the t-posts, hang the field fencing wires, layout the walkways around everything.  They were beautiful!

best tomato rows 2012

It was worth it!  That was the best Pico, salsa’s, and sauce’s that we ever made!  I also took it upon myself to taste-test every single one of those heirloom tomato breeds, and I quickly found my favorites.

  • The Cherokee Purple beat out my Black Krim (both are good, but the purple has a stronger flavor).
  • The Brandywine did not grow many (one more thing I learned, it is a heavy vine plant), but they carried a much sweeter flavor.
  • Then there was the Kellogg Yellow – less acidic so perfect for our friends that love tomatoes but can’t do the acid.

There was just so many different sizes, colors, flavors that I got lost in enjoying tomato salads all fall!  We froze and canned all that we could but gave away tons to others as well.

tomato salad

Episode 803 has now inspired me to revisit that year.  The fire took all my notebooks, but I still have great memories of it all.  This program also showed me some additional steps to help get the best tomatoes I can through the season, not just at the beginning.

I hope you all take a moment or two to watch it – well worth the time! Who knows, you may just learn something new?

never stop learning

href=”http://www.bloglovin.com/blog/14663173/?claim=cmcumugdkcw”>Follow my blog with Bloglovin

WHY?

I have found the answer to the world’s oldest question.

WHY DID…

chicken 1

THE CHICKEN…

chicken 6

CROSS…

chicken 2

THE ROAD?

chicken 5

To run over and steal all the wonderful worms from my gardens as I work!

chicken 3

Hiding behind the garlic grasses will not save you from my wrath bird!

chicken 4

I swear if you girls were not laying 6+ eggs a day you would be freezer meat! (I still have about a dozen other birds you know?!?  And they are staying OUT of my gardens!)

Follow my blog with Bloglovin